


What is Volumetrics Pro ?
Most realistic procedural volumetrics for Blender.
Complete freedom in customization.
Solid preview on Fog & Clouds.
Easy to use.
Solid mode preview
Render
Made out of these shapes
What is Volumetrics Pro? It’s an addon that lets you create custom traffic simulations and quickly fill parking lots with cars. Whether you're animating a single vehicle or simulating traffic with hundreds of cars, everything is real-time using proxy vehicles. Addon includes 55 built-in models with real brands and 46 models with copyright-free brands, all of which are also available as standalone rigged assets.
Empty boolean
Unlimited styles
Solid Mode preview
Procedural skies

Volumetrics Pro
Clouds based on
real-world
Realistic wind animation
98 pre-made presets
The entire library is at the bottom of the page
All professional
Volumetrics in 1 place
Smoke simulations coming as next update
Powered by
geometry nodes
User-friendly
N-panel settings
Create your own clouds

VOLUMETRICS
vɒl.juːˈmɛ.trɪks
Noun
1. Volumetrics simulate the interaction between light and participating media, calculating how photons scatter, absorb, and decay throughout three-dimensional space. This means lighting is no longer evaluated only on surfaces, but continuously across the volume between them.
2. In other words, it’s not about lighting objects - it’s about lighting that nothing between them. (It is more important than it seems like)
Why we created this addon ? We wanted to have all volumetrics we use in one place.
Because only together they create the Atmosphere.
We decided to make them fully procedural, so users have as much control as possible. The volumes side of Blender and its addons has always felt quite limited to us.
We also wanted volumetrics you can actually preview in solid mode (we never thought it would work this well), while making sure they look as realistic as possible - both in solid and, more importantly, in the final render.
Why early access? We believe the addon is already great and can help a lot of people right now - but to release it the right way, we want to finish smoke animations first. Thank you for the support and trust you show us by purchasing this product.
Solid Mode preview on all our volumetrics
Preview fog, skies, clouds and clouds on curve in Solid Mode for faster scene building
and camera work, especially in heavy projects.
Tutorial
FOG
| CLOUDS | SMOKE SIMULATIONS
Create atmosphere. Adding volumetrics, especially fog to almost any scene can completely transform the mood and look, taking your renders to the next level.
Add depth. Create a stronger sense of space and scale in your scenes.

Add light rays. Let light interact with the air between objects, not just their surfaces.
Easy to use with full control
Color ramp + Noise + Transform. These three core elements form the foundation of every fog.
Combined with our Empty Boolean, you can create any combination you need.
Black = 0% density, white = 100% density and shades of gray represent levels in between depending on how light/dark they are.
Density & Height
The Color Ramp controls the contrast of the noise. More black reveals gaps in the noise, while more white makes gaps less visible.
Noise
Boolean
The Color Ramp also controls the strenght of boolean. When you switch sides you create inverse effect.
Easy to use with complete control. Powered by geometry nodes and a procedural materials. All settings are available inside the N-panel.
(No need to touch nodes :)
Full N-panel is in documentation.
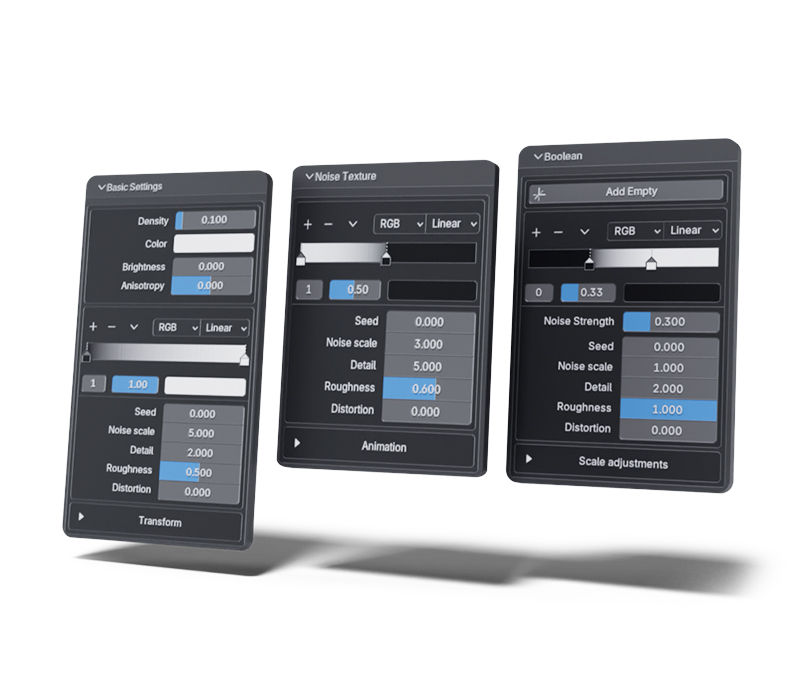
Any shape you need. Shape the fog in Edit Mode. Scaling in Edit Mode keeps the noise size consistent, while Object Mode scales the texture with the object.
Empty boolean. Customize the shape with an Empty Boolean that can be freely moved, scaled, and rotated. A separate noise controls the edge detail.
Unlimited styles
Question you might have
When does the solid mode preview helps the most ? It gives you greater sense of space in solid mode but biggest help is in wind animation preview were you can preview animations with viewport render.
Is solid mode preview realtime ? Yes, when you move around scene. When you change settings, it depends on level of detail you choose. Level of detail in preview can be changed in N-panel.
Is solid mode preview 100% accurate ? Yes, but it depends on preview resolution setting, in high numbers gives you almost 1:1 with render, in lower numbers you at least now where it is or is not. It also depends on lighting but you can always adjust preview density acording to your needs.
How to make fog render faster ? Light paths volume to 4, Volume max steps to 24. In our preferences you can enable that addon automaticaly chage these settings together with import.
All together. When combined, these features give you complete control to create fog exactly the way you need.
The entire preset library is at the bottom of the page.
Tutorial
CLOUDS
FOG | | SMOKE SIMULATIONS


Based on the real-world. All cloud types.
Create every type of cloud you'd normally see up in the sky. We are the only addon that can create all cloud types procedurally. Which means every cloud can be adjusted to fit your exact needs.
Solid mode preview
All our clouds have a solid mode preview. Adjust the preview quality in the N-panel to balance detail and generation time. Once generated, viewport movement is always realtime.
Solid mode preview makes navigating even the large scenes effortless.
Incredible time saver especially for wind animations, you can quickly preview them using the viewport render animation.
Tutorial
SKY | CLOUDS | CURVE CLOUDS

Procedural sky. The fastest way to get a sky into your scenes. Shape coverage in edit mode, scale in object mode and when needed, customize every detail like noise, height, haze and more, in the N-panel.
- No more placing clouds one by one. Create full sky in seconds.
- From an overcast day, through cloud streaks to a full storm - all made with the same system.
- Volumes are heavy to render, with our system create and render only what you really need.
- Use the Empty Boolean to further customize, isolate or cut out areas.
Create a full sky in seconds. As much or as little as you need, shape is fully editable in edit mode.
Empty boolean cutout. Remove any unwanted clouds or create smooth transitions, non-destructively.
Empty boolean isolation. Pick any clouds from the system, isolate it and use it as a standalone cloud.
Unlimited possibilities. Full control over every detail.
Atmospheric haze. Add a subtle layer of haze around your clouds or spread across the entire sky.
Cloud streaks. Easy to create, with full control over size, count and style.
Wind animation. All our clouds have a built-in wind function. Combined with a subtle change in cloud position, it creates a realistic
wind animation.

All settings are available inside the N-panel. Powered by geometry nodes and a procedural materials.
(No need to touch nodes :)
Full N-panel is in documentation.
The entire preset library is at the bottom of the page.
Tutorial
SKY | CLOUDS | CURVE CLOUDS
Procedural clouds. Create exactly the cloud you need, down to every detail. Edit the shape anytime in edit mode and fine-tune the look in the N-panel. Unlimited creativity. Unlimited freedom.
- Combine multiple shapes and styles to create even the most complex clouds.
- Customize everything. Unlike VDBs, every single detail is yours to change.
- From mist and haze to complex heavy storm clouds, all created with the same system.
- Volumes are demanding. For complex scenes and slower PCs, we added a fast preview mode.
Convert any object to a cloud. Choose from a large range of presets and transform any mesh into a cloud with just one click.
Change shape in edit mode. Fully editable even after conversion, with an automatic fast preview mode for a smoother experience.
Unlimited possibilities. Full control over every detail.
Complex clouds. Any shape, any complexity. Icospheres are a great starting point but your creativity has no limits here.
Mist & haze. As easily as this system handles heavy clouds, it handles the simple yet essential atmospheric additions too.
Starting presets. All our presets are fully editable. These cloud presets are built on a single shape so you can clearly see the difference between them. Not a single static preset in our addon.
Real depth. Built on real physics. Looks great under any condition.
Full N-panel is in documentation.
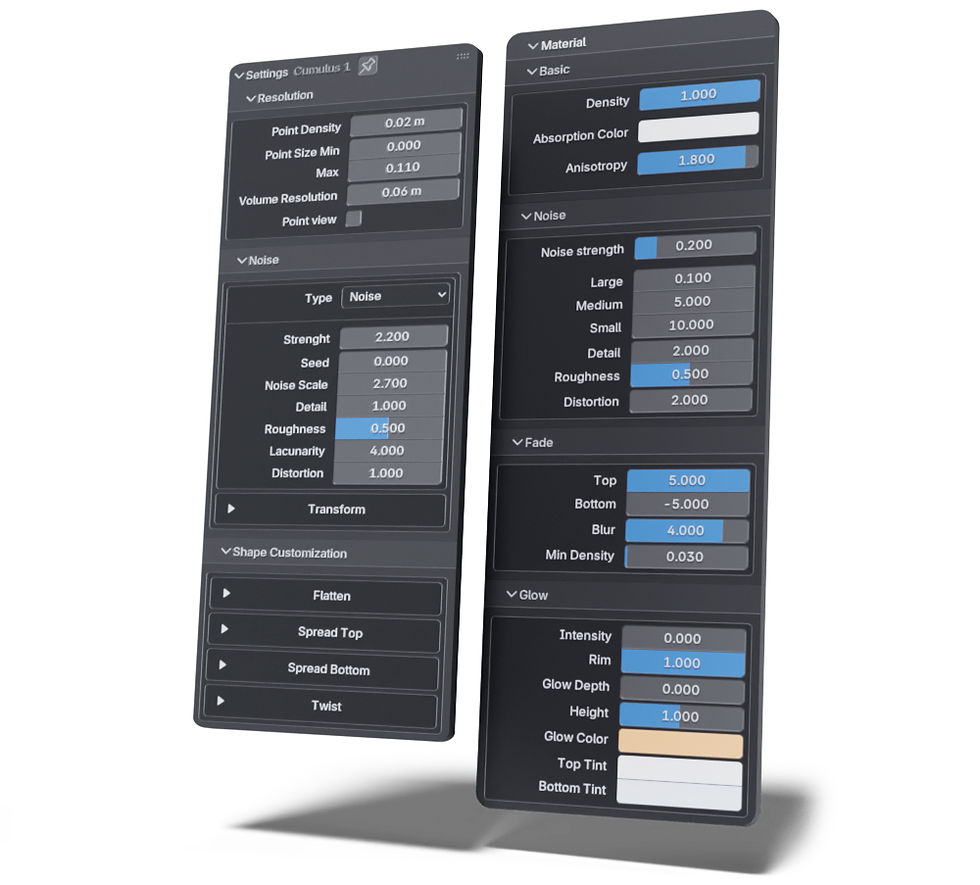
The entire preset library is at the bottom of the page.
Tutorial
SKY | CLOUDS | CURVE CLOUDS

Curve clouds & smoke trails. Built on the same system as our regular clouds - just along a curve.
- Create shape in edit mode and fine-tune individual points with the Alt + S shortcut.
- Create a wide range of smoke trails, all powered by the same system.
- Use effects like top and bottom spread or fade to achieve a more natural look.
Create & edit curves. Draw or extrude and edit, just like any other curve in Blender.
Alt + S radius. Adjust the radius of each point on the curve individually using the shortcut.
Unlimited possibilities. Full control over every detail.
Smoke trails. Apply spread bottom and fade for the best result.
Full N-panel is in documentation.

Tutorial
SMOKE SIMULATIONS
FOG | CLOUDS |
Smoke simulations coming
as a next free update.
Preset library
All presets are fully editable. Anything you don't like or that doesn't fit your scene - you can change it.


Question you might have
What’s the difference between scaling in Edit Mode and Object Mode? Scaling in Edit Mode expands the texture. In Object Mode, the noise scales together with the shape.
Can I isolate a single cloud from the system? Yes. Use the Empty Boolean to cut out a cloud with soft edge noise. The cloud can then be moved, rotated, and scaled freely in Object Mode.
How to go to Site Styles ? Add paragraph text. Click “Edit Text” to update the font, size and more. To change and reuse text themes, go to Site Styles.
How to change Site Styles ? Add paragraph text. Click “Edit Text” to update the font, size and more. To change and reuse text themes.
Question you might have
How to change and reuse text themes, go to Site Styles ? Add paragraph text. Click “Edit Text” to update the font, size and more. To change and reuse text themes.
How to change and reuse text themes ? Add paragraph text. Click “Edit Text” to update the font, size and more. To change and reuse text themes, go to Site Styles.
How to go to Site Styles ? Add paragraph text. Click “Edit Text” to update the font, size and more. To change and reuse text themes, go to Site Styles.
How to change Site Styles ? Add paragraph text. Click “Edit Text” to update the font, size and more. To change and reuse text themes.
The entire preset library is at the bottom of the page.

Question you might have
How to change and reuse text themes, go to Site Styles ? Add paragraph text. Click “Edit Text” to update the font, size and more. To change and reuse text themes.
How to change and reuse text themes ? Add paragraph text. Click “Edit Text” to update the font, size and more. To change and reuse text themes, go to Site Styles.
How to go to Site Styles ? Add paragraph text. Click “Edit Text” to update the font, size and more. To change and reuse text themes, go to Site Styles.
How to change Site Styles ? Add paragraph text. Click “Edit Text” to update the font, size and more. To change and reuse text themes.